Over the years I have spent hundreds of hours with Anki and have seen many different tools and tricks to improve the learning experience for language learners. I’ve gathered most of my best tips here in this post so that you can streamline your Anki experience and make it easier to learn whatever language it is you’re trying to learn.
1. Keep your flashcard layouts simple
There are a variety of different additions you can make to Anki, and we will get into those further down this post. However, if you are just getting into Anki and aren’t really too sure on how to best use it yet then my biggest piece of advice would be to keep things as simple as you can for now.
By all means, explore different shared decks and add-ons but for now, you’ll want to keep your flashcards simple and with an easy-to-read layout.
The simplest and most effective layout you can use for language flashcards is to have the target language on the front of the card and any readings, explanations, definitions, or translations on the back of the card.
This is to ensure that we are learning how to read the language, and not translate between it and your native language which can cause issues with output in the future.
If you have a note type that creates 2 flashcards for displaying “Front” and “Back” then you can go to the Anki browser, sort by card type, and then select the cards that show the “Back” of the card first, and suspend or delete them.
2. Learn Anki’s shortcuts for faster review times
Anki has a variety of useful shortcuts that can help with speeding up study and review time. Most of these can be figured out by using the menus within Anki as they have their shortcuts written on each menu item. For ease of use though I have gathered the most useful ones in a list below as a reference:
- Space: Reveal the back of a flashcard during reviewing.
- 1,2,3,4: Mark your understanding of a card during review (1:again, 2:hard, 3:good, 4:easy)
- E: Opens the edit a flashcard window during reviewing.
- A: Opens the add a new flashcard window.
- B: Open the Anki browser to see your card collection.
- R: Replay any audio that’s on the card.
- – or =: Bury a card for a day (skips it for the current review session)
- Shift+1 or !: Suspend or unsuspend a card (removes it from reviews and marks it yellow in the card browser).
- Ctrl+1-7: Marks a card a certain color, useful for organizing certain cards during review to come back to in the browser.
- Ctrl+Delete: Delete a card
- Ctrl+Z: Undo the last action
Making good use of these keybindings will speed up review times considerably, allowing you to study and review more cards in less time.
3. Install language-specific add-ons
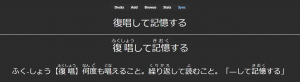
Depending on which language you are studying, you may want to add some functionality to Anki to make it easier for you. For example, the Japanese Support Add-on allows you to add Furigana readings above Japanese text. There are a few language add-ons on the Anki add-ons page which I will link below, however, there may be others too so be sure to check out the add-ons page yourself.
- Japanese
- Download here: https://ankiweb.net/shared/info/3918629684
- Chinese
- Download here: https://ankiweb.net/shared/info/1128979221
4. Review over new
It can be quite easy, especially with some of the tools I will introduce a bit later, to add tonnes of cards to your decks. While I do recommend adding a lot of sentence flashcards to Anki, for use as a sentence bank of example sentences, it’s highly recommended that you prioritize reviewing over studying new cards.
The reason for this is simple, the more cards you add and study the more reviews you will get per day, and if you add a lot of cards every day then the number of cards you will have to review per day will soon get into the hundreds and if you’re not careful, the thousands.
I went through phases of adding 250 cards a day and then I ended up having to do 1000 reviews a day, which took several hours to complete. If you have the time to do this and want to then by all means go for it, however, I’d recommend starting off slow first and building yourself up. Try and limit yourself to 25-50 new cards a day and always complete your reviews before studying any new cards. If you want to add more than 20 cards a day, check section 4 on how to do this.
5. Get the Anki app
Fortunately, Anki has a mobile app, and although it is a little bit on the pricey side for iPhone users (free on Android), I would still recommend getting it. The reason being is that having Anki on your phone will give you way more opportunities to get your reviews finished by the end of the day.
Any moment in your day when you go to pick up your phone to go to Instagram, YouTube, or Tiktok, replace it with Anki instead and you will soon get those reviews down to 0. Personally, I did most of my reviews while commuting to University. It’s surprising how many you can get through on a 45-minute bus journey with some good study music playing on your headphones.
Spreading your reviews out over the day in small segments can do wonders for progress.
6. Remove Anki’s review limit
By default, Anki has a review limit for every deck you make. To begin with, you may want to keep this limit in place, but eventually, I would recommend removing it, otherwise, your reviews will build up without you knowing and it’ll become harder to review and remember cards.
For example, the default is set to 100 cards to review per day, but you may have another 50 or more scheduled for that day as well. The reviews you don’t see will definitely increase with time as you add more cards to your deck.
What happens then if you don’t review those cards that are past the review limit?
They simply get rescheduled for the next day, meaning that the extra reviews you would have for that next day will also get pushed back a day, and so on and so forth.
Eventually, it’ll reach a point where you will start to get to cards that you just can’t remember at all because they’ve been delayed over and over again.
The feature is meant to not overwhelm you with reviews and that’s fine, but for users who are expecting to do most of their study with Anki, over a long period of time, it’s best to change this setting.
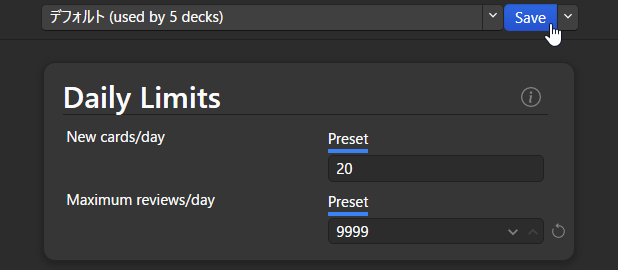
To do so simply click on the settings cog next to the deck that you want to change the review limit on and click “Options”.
Then click on the textbox next to “Maximum reviews/day”. Change it to 9999 and then click “Save”, this will allow you to review all the cards that are scheduled to be shown each day.

You can also change the number of new cards you can learn here, I recommend anything less than 50 for a manageable amount of reviews that also gives you great results.
If you do get too overwhelmed with the number of reviews you are getting then you can find some tips on dealing with this issue further in this post.
7. Put multiple decks into 1
Having multiple decks to organize your cards is definitely a good idea, but it can be a bit of a pain when it comes to reviews. Having just one deck to review will reduce any psychological resistance compared to reviewing multiple decks.
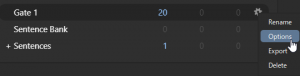
Luckily Anki allows you to “nest” your decks, meaning that you can consolidate them all under one main deck for review when you review but still have cards separated into different decks. All you have to do is drag and drop your decks into your main review deck.
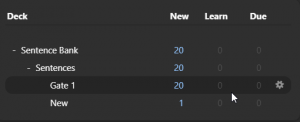
So in this case you would want to click on “Sentence Bank” to review all the cards in all the decks that are contained within, and you still have the decks separated for ease of use when editing or changing cards.
When reviewing Anki will shuffle cards from all of your decks and show them randomly, as long as they are scheduled to be shown.
8. Be consistent
Anki is a great tool and can significantly reduce the amount of time you spend studying, but only if you use it daily. A couple of missed days can easily build up your reviews into the hundreds and make it harder to study when you come back to them.
Above all else make sure that you study every day and try and get your reviews down to 0. Set an alarm on your phone to remind you to do your reviews and you will soon build up the habit of doing them daily.
Don’t panic when things do build up though, there are a number of ways to reduce your review workload if things do get a bit messy.
9. Dealing with too many reviews
Taking a break from Anki can be a bit of a pain as reviews will build up and it can be a nightmare to come back to, but don’t go for the nuke option of resetting your deck as you’ll lose a lot of progress doing so.
In this scenario, go back to tip 6 and follow the instructions to reduce the review limit down to a manageable amount and get back into studying daily, getting your reviews down to 0. As you get back into the swing of things you can up the limit gradually and slowly get through your backlog.
Deleting and restarting a deck in the long run will take up more of your time, it’s always best to stick it out and get through your reviews.
If you’re getting a lot of review cards since using Anki for a bit and have found that your reviews are stacking up and becoming unmanageable, then there are likely a few things that you aren’t utilizing during your study sessions.
Bury, suspend, edit, and delete should be tools that are used regularly when reviewing Anki, especially for language learners.
It’s super easy for language learners to add lots of flashcards, especially in the beginning, as there’s lots to learn. As time progresses though and you get better and better at the language, a lot of the cards you added at the beginning of your Anki usage will no longer be helpful to you and as such you can delete most of them.
You can get away with this because languages build on previous knowledge. It’s like rolling a snowball down a mountain, picking up snow (vocab, grammar, etc) until it turns into an avalanche (fluency). Once you’ve reached fluency, or even just progressed to an intermediate level, you’ll know a lot of the easy stuff and it’ll forever be ingrained in your long-term memory.
At this point, you’ll no longer need Anki to remember “Hello, my name is ___.” for you, so when any of these easy cards show up in your reviews, simply delete them from your deck using Ctrl+Del, and don’t worry about your total card count going down as you’ll be making way for new, better quality cards that are at your current level.
Editing and deleting difficult cards is also something I had to learn to do, and it took me a while before realizing that not doing so was setting me back.
At any given point, a language learner can only learn new language that is slightly above their current level, and if you’re using pre-made Anki decks or sentence mining from an array of sources then you’ll definitely come across some difficult sentences.
Most of the time you should ignore these and skip over them, but if they do find their way into your Anki deck, don’t feel you have to study or review them just because they’re in there and you’ve made a card for them.
If you’re constantly coming back to the same flashcards over and over again because they just won’t stick, then either edit them to add more information on the back of the cards, or delete them instead. I would usually recommend just deleting them, treating this as a sort of “pruning” of your deck, and removing the “thorns” to make your review process easier.
You can delete the current card during a review with the “Ctrl+Del” hotkey.
Remember that the language isn’t going anywhere, and you don’t need to learn everything to get to fluency. Deleting cards shouldn’t be looked at as a bad thing, especially if it’s making your review times slower.
When it comes to the difficulty of new cards, the ideal situation is that you learn a sentence that you aren’t quite sure about, find some definitions to confirm whether or not you understand the words, grammar, and the sentence as a whole, and when you think you’ve “got it” then add it to your deck. If the card is too easy or too difficult then delete it and move on to the next.
You can also make good use of the bury and suspend options to delay cards or prevent them from showing up in reviews. Burying will not count as being reviewed and it’ll show up again the following day. Suspending a card will prevent it from showing up in reviews completely and mark it as yellow in the Anki browser. You can then go into your deck and unmark them later.
Burying is nice for moving reviews to the next day if don’t have time to edit them or review them but it’ll rarely come up.
You can bury a card using the “-” or “=” hotkey.
Suspending a card, however, is much more useful. If you find some cards in your review process that is a little too difficult but you don’t want to delete, then you can suspend them and then find them easier in the browser for further editing.
As these cards get marked yellow, you can go to the Anki browser, select your current deck and then find them at the bottom of the card list. You can then edit them from the browser, or you could move them to a different deck and edit them one by one as you review them.
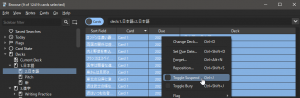
You can suspend cards during review with the “Shift+1” or “!” hotkey and you can find them in the browser as shown below:
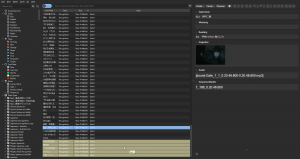
Just be sure to unmark them as suspended when you are done editing them so that they show up in your reviews again.
And finally, while you want to keep your review sessions streamlined and fast-paced, you can always edit a card when it comes up if you think it needs some extra information, or if you find something wrong with it.
To edit the current card in a review session simply press “E”.
I wrote another post on reducing anki reviews a few years back and the advice still holds true to this day, so it might be worth a read as well.
10. Make use of images and audio
Flashcards in Anki don’t just support text, you can easily copy and paste image files, and audio files and even add links to text. In fact, there are numerous tools that make use of this to allow you to create high-quality flashcards that are easier to study with than just text. The beauty of adding audio and images to your cards is that it makes them easier to recall where the sentence was used, and if you can remember that scene in the show that you watched, it’ll bring a whole lot more context to the phrase you’re trying to learn. Making language as comprehensible as possible is key to acquiring new language.
On the edit screen of any card (shortcut: E), you can copy and paste (or drag and drop) media into any of the fields you wish. For language learners using TV shows as study material, I recommend having a screenshot of the moment the sentence was said to give context and adding that to the front of the card.
You can also record and add the audio of said show to the back of the card to check that you’ve read a sentence correctly.
There are actually some useful tools out there that will do this for you both on the fly and in bulk. They do take a little bit of setup which I won’t go into here as it would take too long but I will summarise both and put links to guides for setting them both up.
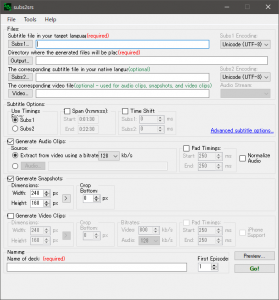
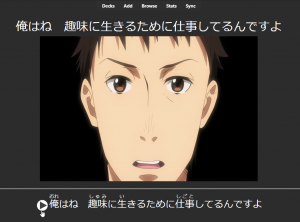
This first one is called Subs2SRS. It’s a small, simple and completely free program that takes a video file and a subtitle file to generate flashcards for Anki. It does this in bulk, so you can generate flashcards from an entire episode of a show or an entire season. These flashcards will be basic though and will still need to be edited to add things like definitions or readings.
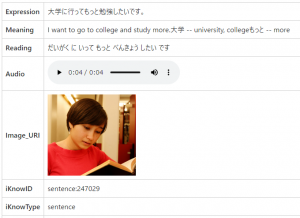
Here’s an example of a flashcard that’s been created by Subs2SRS (definitions have to be added manually).

If you’re just starting out though then you can also add English subtitles to put both the target language and a translation on each card.
For a full guide on how to use Subs2SRS check out my guide to turning TV shows to Anki decks and my post on finding Japanese subtitles. If you’re learning another language you’ll have to search Google or use Netflix+subadub for subtitles, or use the next tool, Migaku, instead.
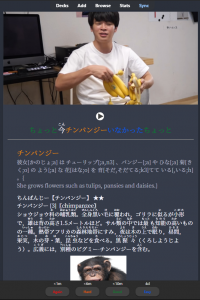
The other tool is Migaku, which is a paid service but has a lot more functionality than Subs2SRS and is the best tool for language learners that use Anki on a daily basis. It’s great value for money and you can get an extra month with my affiliate link here: https://migaku.com/signup?code=britvsjapan.
Migaku is a browser extension that integrates with Anki, allowing you to highlight text on any webpage, or even subtitles on YouTube and Netflix, and send it straight to Anki while also automatically adding definitions to the flashcard as well. It can generate furigana for text on the page, as well as pitch accent notation and supports a bunch of other languages as well as Japanese, with support included for those languages. It also comes with a dictionary lookup feature for text on webpages too, so you can highlight a word and quickly grab a definition for it.

It’s a great tool for saving time when making your own cards and also allows you to do the same thing that Subs2SRS does, but you don’t have to spend ages looking for video and subtitles files, nor do you have to turn an entire episode or season into a deck. If you only want to pick out just a few sentences when you are watching something then Migaku is a much better tool than Subs2SRS.
For a full tutorial on setting up Migaku so that you can automate card creation, and have flashcards that look like the one above, take a look at my Migaku setup guide.
11. Take a look at shared decks but avoid studying them
One major feature that Anki has is the ability to export and import decks, and as such people have been sharing their decks for years now. You can find most of these publicly available on Anki’s website, although some people share them outside of Anki’s website too.
You can access these decks on the Shared Decks section of AnkiWeb.
I’d recommend playing around with some of these just to get a few new card types that you can use and to see how other people lay out their flashcards. Be wary though that these decks can be uploaded by anyone and so might not be that great. I generally recommend not studying any pre-made decks from other people due to the lack of context, it’s always best to make your own cards from content you’ve read or watched, as you’ll learn and retain these much easier.
However, the Core 2000 decks are generally a pretty decent deck to start with if you are lost and aren’t sure how to properly make your own flashcards yet. These decks provide an example sentence with an image, audio, and translation.
They are bi-directional though so I’d recommend deleting the cards that show the English on the front, and only studying it from JP -> EN. Don’t rely on these or any other decks though, eventually, you should branch out and start making your own flashcards from content you watch in your target language, otherwise, you’ll be stuck at a textbook level.
12. Browse the Anki Add-ons page
There are also a bunch of different add-ons for Anki that can add/improve functionality and allow you to do all sorts with the app. While I would definitely recommend taking a look at the add-ons page, don’t get carried away and install lots at once as you might corrupt Anki, and it’ll be a pain to sort out. Have a good look through and be sure to check that the add-ons you find will still work by checking the comments and cross-referencing what version the add-ons are for.
For my pick of some of the best add-ons check out this post here: Top 20 Anki Add-ons, and to check all of the add-ons uploaded to the Anki site check here.
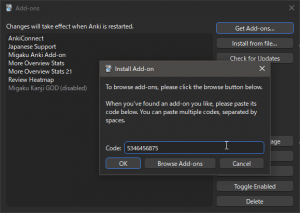
To install add-ons to Anki you’ll need to scroll to the bottom of one of the add-on pages and grab the long number that’s in a blue box like below:
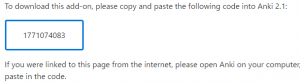
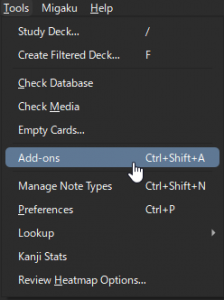
Copy it and go over to Anki, go to Tools -> Add-ons -> Get Add-ons, and paste that number in the text box.
You will need to restart Anki each time you install or remove an add-on.
One of the best add-ons that I’d recommend to everyone is the Review Heatmap add-on, as it gives you a visual representation of how many cards you’ve studied daily. It helped keep me on track and prevented me from not doing my cards because I didn’t want to see a grey box where it could have been green like the rest, it sounds silly but it works. There are also some other great add-ons for tracking your progress which I highly recommend taking a look at because…
13. Tracking your progress is key
When it comes to language learning, it can take an awfully long time to reach fluency. We hear people on the internet talk about fluency in months, but the reality is it takes years to reach any decent level of fluency in most languages. As such it can be quite frustrating at times when you still can’t really speak the language and can’t really tell if you’ve been making much progress or not. The human brain just takes a long time to get used to a foreign language, so using tools to track your progress within Anki can be a huge relief and motivator for you to keep going.
Anki does come with its own statistics for decks, but there are also a range of add-ons that can provide more information and display it better for you to understand. By default though you can access Anki’s statistics by clicking the “Stats” button at the top of the main menu next to “Browse”.
This will give you a graph display of your reviews, your new cards, your retention, etc. Check this whenever you feel like you’re not making progress, and see just how much you’ve actually accomplished.
Here are some add-ons that add to these statistics:
- Review Heatmap
- More Decks Stats and Time Left
- Progress Graphs and Stats for Learned and Matured Cards
- More Overview Stats 2.1
- More Overview Stats
- Study Time Stats
For such a simple program, you can do a lot with Anki and I’ve no doubt there are other tips and tricks that I’ve forgotten about so be sure to check back here or my Youtube channel for future Anki tips for language learners. For now though, I hope you found these tips useful!
Click here for more information on language learning