I have mentioned the idea of Sentence Banks before in a few posts. In this post I will explain to you what this concept is, how it will benefit you and most importantly how to actually make your own Sentence Bank.
Thumbnail source: Japanese verbs beginning with た. Can you read them all? Source: https://goo.gl/Czhh3I
Why Use Sentence Banks?
Sentence Banks are a great tool for anyone following AJATT or the 10,000 Sentences Method.
Sentence Banks make Sentence Mining easier for 2 reasons.
They allow you to:
- Quickly mine thousands of sentences.
- Find great example sentences using Anki’s inbuilt browser.
Below you can find a video of me demonstrating how I use this method to both mine sentences and store/search for hundreds of example sentences.
But what in blazes is a Sentence Bank?!
A Sentence Bank is exactly what it sounds like. It is a massive collection of sentences, the aim here being on quantity (100,000+ easily) and quality (context with audio and imagery). In this tutorial, I am going to show you how to convert entire seasons of TV shows into Anki flashcards and how to study with them for maximum efficiency.
The following post is a full step-by-step tutorial.
To see how I study with this method, check the last section of the page entitled Sentence Mining.
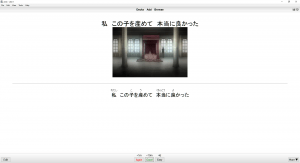
Here is an example of what the sentence cards look like (they also have audio on the backside of the card).
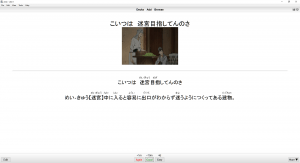
Each sentence has the front sentence along with the scene of the show that it comes from. As you will remember what situation the sentence is being used in, this gives you a high amount of context. And context is incredibly powerful.
Each sentence also has audio on the back which tells you exactly how the sentence is pronounced. I’m not a linguist but I feel that this has helped me to improve my accent subconsciously, as I have heard the correct pronunciation for nearly all the sentences I have learnt. At the very least, having this is a nice aid.
Every sentence also has normal furigana readings that can be generated with the Japanese Support plugin for Anki. Support for readings are also included for dictionary definitions as well (use Anki’s “Add” option to generate furigana for dictionary sentences then paste them into the “Meaning” field, see Step 4.5 in the second half).
Of course, you are free to change the layout and I will show you exactly how to do this later on.
How do I get thousands of these sentences and how can I use them in my sentence mining efficiently?
I will answer the first question in this post by giving you a full tutorial on how to make thousands of these high quality sentence cards for Anki, using subs2srs.
Or you can get access to my sentence bank by supporting me on Patreon.
The second question I will answer is how to use Sentence Banks efficiently. I mention this briefly at the bottom of the post in the section “Sentence Mining“.
There are some prerequisites that you will need before starting this process.
- A film, TV series or other form of video in your target language.
- Accurate and correctly timed subtitle file(s).
Unfortunately, I can’t help you with obtaining the video files of whatever it is you want but a couple of sites you can use for subtitles if you are learning Japanese.
Anime – http://kitsunekko.net/
Dramas – http://www.d-addicts.com/
Once you have a video file and its corresponding subtitles file then we can start the process.
If you need to change the timing on your subtitle files then use http://www.aegisub.org/.
You can also turn YouTube videos into Anki decks as well. Check out the tutorial below for more information.
How to Create Your First Sentence Deck with subs2srs
This program is one of the main reasons my reading is so good. If you can use it in the right way, it will become an incredibly powerful tool for you.
Here is the page for the software (it looks a bit old but it is perfectly safe)
http://subs2srs.sourceforge.net/
This page also has more detailed instructions which you may wish to look at. I will be explaining the bare minimum that you need.
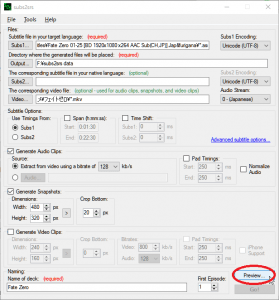
Once that has downloaded and you have opened the software, you should end up with a screen that looks like this↓
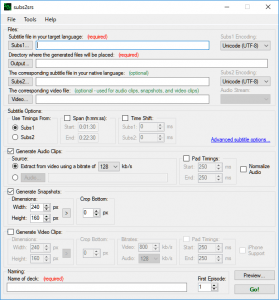
Take some time to have a look at the features and see what you can do with the program. It can also produce video for flashcards but I have yet to get this working.
Step 1: Add L2 Subtitles
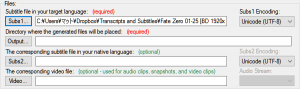
To add subtitles to subs2srs you will first need to click the Subs1 button near the top of the program.
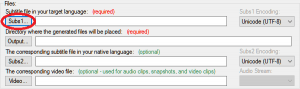
Once clicked, a file browser will appear. You will then need to find the folder that your subtitles are in.
From here, click the first file and click the open button, (I apologise if you can’t read my systems buttons, but it is the one highlighted blue that says 開く(O)).
The top part of the program should show that it has added the subtitles correctly.
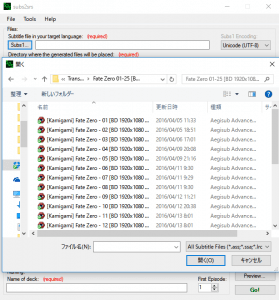
Now here is where it gets interesting. For adding multiple video files we are going to need the star wild card which is just an asterisk, (*). We are going to use this to get the entire seasons’ subtitle files as well as video files. Don’t worry if you don’t know what a wild card is or how to use it, just follow the instructions and you will be fine.
First, click on the subtitles path and use the mouse, or arrow keys, to get to the end of the file path.
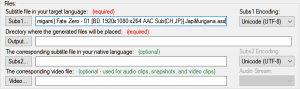
Then highlight all the way up until you reach the “\” (or in my case “¥”), which indicates which folder you are in, making sure NOT to delete the file extension (in this case the .ass part ( ͡° ͜ʖ ͡°) ).
Now simply add the asterisk before the file name and this will automatically select all the “.ass” files that are in the folder you are pointing to.
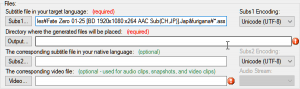
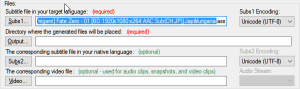
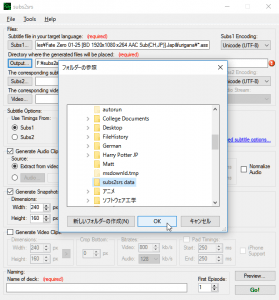
Step 2: Set Output Directory
This is very self-explanatory. Here you will decide where the files that this program generates are going to be saved. Click the Output button and choose a location. I recommend creating a new folder for this or it is going to get messy.
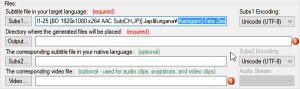
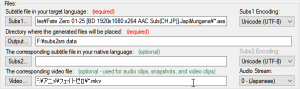
Step 3: Adding Video(s)
This is going to be the same process as the subtitles. Click the “Video” button, find your video file(s) and select one that is in a folder. Then if you want to add all the files of the same file type in that folder, use the asterisk (*) again followed by the file type.
Tip: I don’t recommend overloading the software with a lot of video files at a time. It is liable to crash and you will have to start over. Usually, a series of about 20-30 episodes will be fine. If it does crash then just start again.
Common Error & Fix
It is common to get this error.
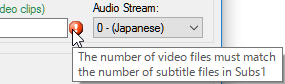
The reason this occurs is usually because you have forgotten to use (*) for one of the fields or because there are more subtitles than there are video files or vice versa. So make sure that there are exactly the same number of subtitle files as there are video files.
Step 4: Naming the Deck
The next step is to give the deck a name so you can find it in the output folder. I’m just going to call it the name of the series I am using.

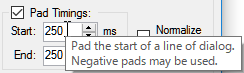
Step 5: Tweaking Subtitle Timings
Note: there is another option further up to “Span” and “Time Shift” the subtitles. I have never used this feature but if you experiment then it might be useful. I personally use a piece of software called “Aegisub” to correct my subtitles.
Most of the time you will be using subtitles that are synced up with the video correctly, but if they are slightly off then you can use this feature to quickly fix this issue. You will have to experiment with what works best.
Step 6: Removing Hard Subtitles and Image Sizing
Second is the image sizes and cropping. I recommend a width of 480px and a height of 320px, this is not too big nor too small. If you have hard subtitles on your video file then you can use the crop bottom option to remove pixels from the bottom upwards. Under Crop Bottom (on the right), the more pixels you put the more will be deleted.

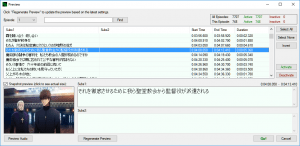
Step 7: Testing
Okay! Now that you have all your settings adjusted and you make sure that all the options you want to use are ticked, go ahead and click the “Preview…” button.
Once you hit the preview button a menu will appear. From here you can check that image is the right size, the audio is synced up correctly and that the subtitles are showing up properly. You can also click the “Episode” drop down list which allows you to check other episodes if you are doing more than one video.
Step 8: Go!
Once you have checked that everything is fine, click the green “Go!” button! Leave subs2srs to do its thing (could take up to an hour or more) and go read a book or do some sentences 😉
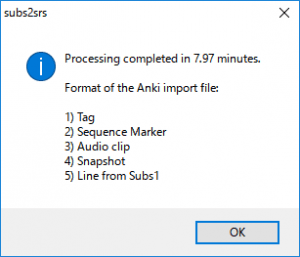
Once subs2srs has finished, you will get a message like the one below. DO NOT CLOSE THIS! We will be needing this in the next part…
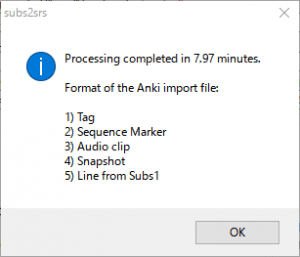
You may get a message about long lines. This depends on the person but you may or may not want to keep them. I usually keep them.
Importing to Anki
In this next part of the tutorial I am going to show you step-by-step how to import and setup the output of subs2srs in Anki.
Step 1: Importing the subs2srs Template
Make sure that the message that you left open from subs2srs is still open and then go to Anki.
Once in Anki, go to File -> Import.
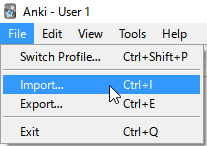
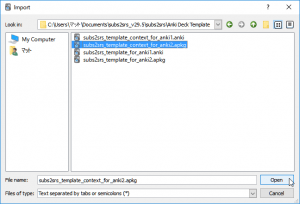
Then find the location of where you saved the subs2srs program. Once you find the folder go to subs2srs_v29.5 -> subs2srs -> Anki Deck Template and select subs2srs_template_context_for_anki2.apkg
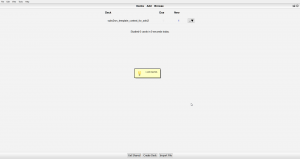
Anki should now have a new deck or will have replaced the default deck with the name of the template file, like below. This is just importing the “layout” that is needed to support the types of cards made by subs2srs. If you don’t see any change but that little yellow dialogue box appears then it has probably imported fine.
It maybe a good idea to make a new deck at this time for the TV show or set of videos you are making.

Step 2: Adding Furigana Reading by Creating a New Note Type (Japanese Learners Only)
If you want to add furigana readings to your sentence cards then you will need to do this step as well. We have just imported a new note type from subs2srs but this note type doesn’t support furigana reading support that is provided by the Japanese Support plugin. To fix this we are going to create a hybrid note type which will use both.
First you will need to make sure you have Japanese Support for Anki, so go to this link and download the add-on if you don’t have it yet. https://ankiweb.net/shared/info/3918629684
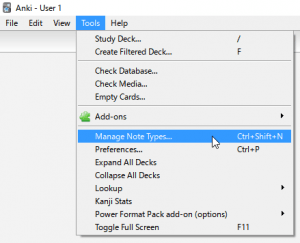
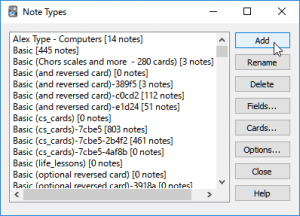
Then once it is installed and you have restarted Anki, go to Tools -> Manage Note Types…
The Note Types manager should then appear on-screen with a list of note types. You will need to click the “Add” button which will take you to a separate window.
I have been using Anki for a very long time and have experimented with lots of different decks and card layouts. As a consequence of this, mine is very much a mess and you should have a lot less note types.
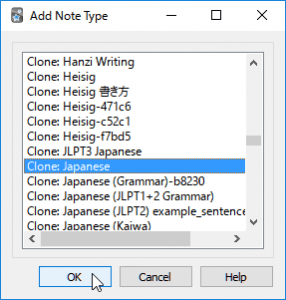
Find the note type “Clone: Japanese” and click “OK”. If “Japanese” doesn’t show up then look for “Japanese Recognition” and use that instead.
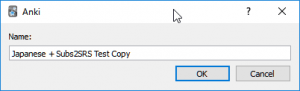
Then Anki will ask you to give the new note type a name. I suggest something along the lines of “Japanese + subs2srs“. Click “OK” and the new note type will have been created.
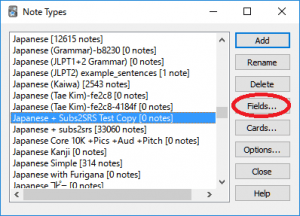
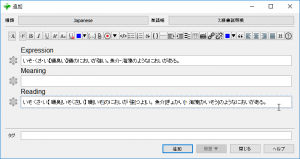
Next, find the new note type in the Note Type window and then click the “Fields…” button.
A new window should appear that will show you the different fields that the note has in it. So far yours will just look like the following image.
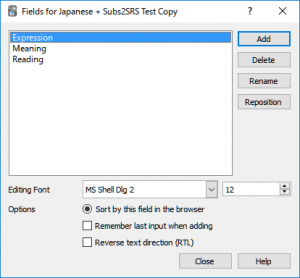
Now, to make this note type work with subs2srs, we are going to need to add a few fields.
To do this, simply click the “Add” button and add the following fields to your note type, keeping the original three the same.
If you get video working then feel free to add that as well. Also add any other fields you may want.
Here’s the note type I already use:
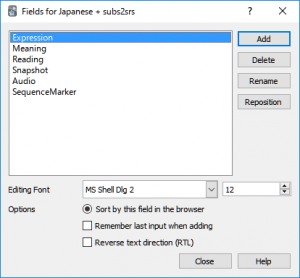
Purpose of each field
Expression – Contains the original sentence you want to learn.
Meaning – Allows space to contain dictionary definitions and explanations of words or phrases.
Reading – Provides another copy of the original expression but with furigana above the kanji so you know how to pronounce the sentence.
Snapshot – Space to store the image of the scene where the sentence was said.
Audio – Space to store the audio pronunciation of the sentence.
SequenceMarker – Stores the timing of when the sentence was said (useful if you want to refer back to the scene).
Adding furigana support to other fields
Normally with the Japanese support plugin you can only add furigana to the reading field of a card.
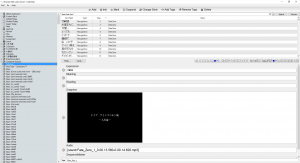
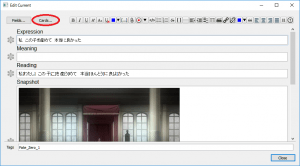
Well with this new type we can add furigana to any new field we like, all we have to do is Edit a card by pressing E during study and then click the Card button on the top left next to Fields.
This should bring up the following window:
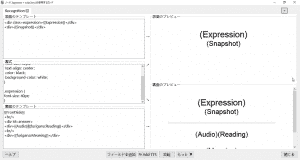
This is the layout of your flashcards which is coded with HTML, which is a very simple programming language, but don’t worry, you don’t need to know any HTML to get this to work.
All you need to do, is find the fields that you want to have furigana support on, so in my case I want to add furigana to the Meaning field which will add furigana support to dictionary definition.
In my case the field I want to add furigana support to is on the back of the card, but you may use any field on any part of the card.
My code looks like the following:

Hopefully you can see the fields, {{Audio}}, {{Reading}} and {{Meaning}} here and you should see that the Reading field will be written like this {{furigana:Reading}}. This is just telling Anki to give the Reading field furigana support. So to add furigana support to other fields, we just have to add this to the front of those fields.
So like in the example above, if you want to add furigana to the Meaning field then all you have to do is change {{Meaning}} to {{furigana:Meaning}} and you will now getting furigana support for that field too.
You will then have to add furigana manually using the Add window while editing a card like in the video below:
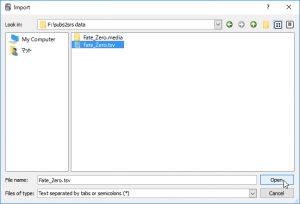
Step 3: Importing the subs2srs Generated Deck
Again you are going to want to go to Anki and go to File -> Import. Then find the output directory for subs2srs. From there, click the name of your series (which should be a .tsv file) then click open.
Then, Anki will bring up a menu that looks like this ↓
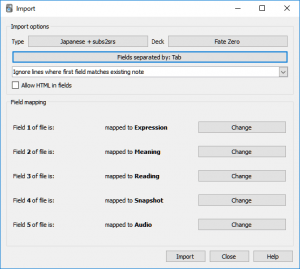
Make sure that the note type is the one you created earlier. If not click the note type that is selected and you can change it to the one you made (CTRL+N). Also make sure that the deck is the correct deck you wish to save the cards to. If not then select that and change it as well.
We are then going to get the message that subs2srs output and make sure it matches up with this window.
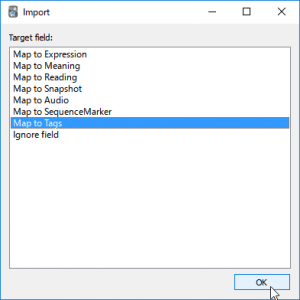
We can see that they are not in order so we are going to need to make sure that they are. As the first outputted line by subs2srs is “Tag”, we are going to change “Expression” in Anki to “Tag” by clicking the “Change” button. A new menu should appear. From here click the correct field and click “OK”.
Once you have done this for each field, Anki should match up with the output message from subs2srs. Make sure you also check the “Allow HTML in fields” otherwise your images will not show up! Mine is below.
Note; Field names may not match up entirely with the message. “Expression” should be used in place of “Line from Subs1”.
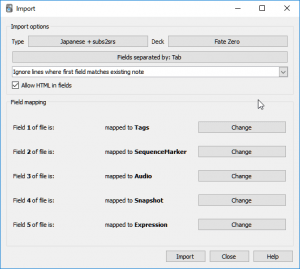
Once this is done, click “Import”.
Step 4: Importing the subs2srs Generated Media so that Audio and Images Work
For Older Versions of Anki
If you try the deck now you will notice that audio, images and readings (if you are learning Japanese) do not yet work. To get audio and images working we will need to add the media generated by subs2srs to Anki’s media collection folder. This folder is in Documents -> Anki -> User 1 (or the name you’ve given your profile) -> collection.media. If your Anki is in a different language then the folder will be named “User 1” in that language, e.g. mine is ユーザー1 because mine is in Japanese.
For Newer Versions of Anki
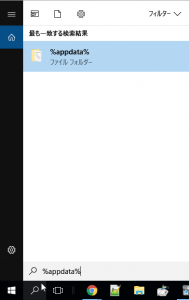
Since a recent update Anki has changed the location of these folders. If you can’t find them using the previous method then you should be able to find them using this method instead. First search for %appdata% and open the folder that appears, like in the screenshot below:
Once you open AppData, go to Roaming if you aren’t taken straight to it, and find Anki2.
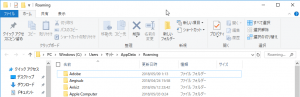
Open Anki2 and look for User 1 (or the name you’ve given your profile). If your Anki is in a different language then the folder will be named “User 1” in that language, e.g. mine is ユーザー1 because mine is in Japanese.
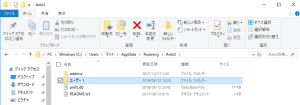
Open up User 1 (or the name you’ve given your profile) and then open up the collection.media folder. This is where Anki stores all media related to your flashcards.
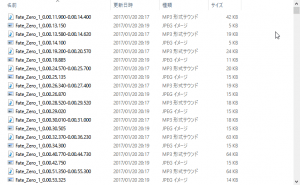
Once found, keep this open and find the output folder that subs2srs used earlier. Find the folder that is named the same as your TV show with .media after it, then open the folder.
.
You should see lots of music and image files. You are going to want to copy ALL of these from this folder over to the collection.media folder in Anki.
To copy all use CTRL+A (to select all) then CTRL+C (to copy) and to paste in the target folder use CTRL+V.
Depending on how many episodes you have done, this could take a while. Once it has finished transferring, you can test the Anki deck again to see if audio and images work. It might be worth restarting Anki if it doesn’t work. If you try the deck now you should see something like mine. You should have sentence, an image and some audio on the card.
Step 4.5: Adding Readings for Japanese Learners
To add readings open up the browser by click “Browse” at the top of the main page of Anki or by pressing “B”. Then find the name of your deck and click it.
Once you click the deck, the contents of it will appear on the right. Here you need to select every note in the deck by clicking CTRL+A. Then go to Edit -> Bulk Add Readings. Anki may freeze for a bit but just be patient. Once it has finished you can check in the browser whether readings have been added by clicking a card and scrolling down. Or you can check the deck again.
Once done the deck should have readings for every card like so:
To generate furigana for the Meaning section we are going to have to do something slightly different. Anki will only generate Readings for anything that is in an “Expression” field. We can make use of this by clicking “Add” and putting our dictionary definition into the “Expression” field of a “Japanese” note type. Click on the “Reading” field and it should generate the furigana in brackets. From there, simply copy and paste it over to the card you want it in.
Tip: For efficiency it might be a good idea to create a new deck to save these expressions in. That way you can just click “Add” and this form will reset to a new blank “Add” form. This means you don’t have to delete both fields with your mouse. 🙂
Step 5: Checking/Changing Card Layout
I have made a lot of changes to this over the years and I vaguely remember that the layout for these cards was completely different when I first used this method. I have since changed the code on the cards to make the layout suit me. Personally I prefer having the sentence on the front with the image to give context. Then on the back I will have audio, dictionary definitions and how the sentence is pronounced. I will show you where to go to change this and my code so that you yourself can use my layout (if it is different).
First, go to the deck and press “E” to edit the card. A new window should appear like the one below. From here you need to click the “Cards…” button.
Once you click “Cards…” this window should appear. It has code for the layout on the left and a viewer on the right to see changes that are made.
To make sure your layout is the same as mine, just copy and paste the following code into the correct sections.
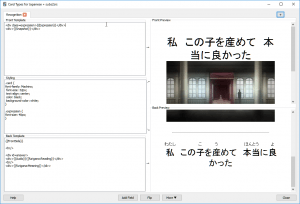
Front Template
<div class=expression>{{Expression}}</div>
<div>{{Snapshot}}</div>
Styling
.card {
font-family: Machino;
font-size: 32px;
text-align: center;
color: black;
background-color: white;
}
.expression {
font-size: 40px;
}
Back Template
{{FrontSide}}
<hr/>
<div id=answer>
<br/>
If you want to re-arrange parts then take the bits that are in curly brackets and move them to a different location, making sure that they are included inside a
<div>
For example:
can be moved to the Back Template and you will have the image on the back instead. If you have other fields with Japanese writing in them and you want to have furigana readings for that field then you can add “furigana:” to the curly brackets, like this;
Step 6: Repeat
Now do this again for as many shows as you want and you will have yourself a massive Sentence Bank!
Step 7: Sentence Mining
I spoke at the beginning of this post about why Sentence Banks are so powerful. The main 2 reasons being,
- Able to quickly mine thousands of sentences.
- Able to find great example sentences using Anki’s inbuilt browser.
The first reason is because you can go to a deck that you have made in Anki and you can go through the cards one by one as if you are watching it live. As you do lose some contextual and background information that is not included in speech, I do recommend watching the video first and then using Anki to go over it again later.
My process when Sentence Mining these decks.
- Open deck, press “Space” to view back of the card and play audio.
- If I understand the sentence completely, I press “Delete”.
- If I don’t understand the sentence or a word/phrase then I press “Shift+1” which “Suspends” the card. Suspending means Anki will prevent you from seeing it until you un-suspend it in the browser. I use this to “Save” cards for later.
- If I understand all the words but come across a new grammar structure, I hit “Space” and learn the sentence without editing it.
- Rinse and repeat!
I do this process REALLY quickly. I want to make it seem like I am just re-watching the show again, not like I am studying. I have done this for well over 30+ Anime and TV shows and it has helped my reading drastically.
After I have finished a series or a film I will add those sentences that have been suspended to a side deck I call “New Sentences” and then “un-suspend” them. In here I go through them again, adding definitions to the ones I want to keep in my main deck (which has the 10k) and delete the rest that are too easy or I don’t want to add. After I have done this I then simply move the cards in bulk to the main deck.
I don’t recommend learning while going through the deck the first time. The first pass should be enjoyable and should just be a process of “saving” the sentences that you don’t know. If you do this for 20+ decks then your reading is going to get pretty good. 🙂
The second reason to use this technique is because Anki can act as a brilliant database. If you accumulate a few decks of different TV shows then you will have thousands of example sentences. If you then find a word you don’t know in your immersion environment, and want to study it, you can search the browser in Anki for other sentences with the word in. This will give you a better understanding of the word and give you quick access to high quality contextual sentences, making remembering words much easier.
I hope this tutorial was helpful. If there are any issues or problems you don’t understand then comment below.
Thanks for reading.
Click here for more Language Learning Advice and Resources
マット
2017/21/01
By Matthew HawkinsHere are some of my favorite tools and sites for learning Japanese
Thank you for reading this blog post, which I hope you found useful for learning Japanese. Here are some of the most useful websites that I’ve found for finding Japanese content to use for immersion as well as some really useful learning tools to help you through your Japanese studies. Some of these are affiliate links which just means that if you decide to use these sites by clicking the following links, then I will earn a commission. But honestly speaking, these are the sites that I use and recommend language learners, even my friends, to use anyway.
Anki Tools: To get started, I really like Migaku for Anki. By itself, Anki is already a super useful tool for language learners but Migaku allows for integration with websites like YouTube and Netflix, allowing it’s users to create flashcards from the shows and videos that they are watching, as they are watching them. If you use my link you can get an extra month for free.
Speaking Practice: For this I absolutely love iTalki. There are thousands of Japanese teachers on the platform that are available at all times of the day to have conversations with you, in Japanese. Some teachers take a more traditional approach while others are just there to chat, these are the ones I would recommend if you are looking to improve your conversational Japanese. Lessons start from just $5 and there’s no long term commitment, I highly recommend them.
Immersion: I’ve used a lot of different earphones / headphones over the years but by far the one that has come out on top is the NENRENT S570. This is a singular in-ear earphone that matches your skin tone to keep it discrete, meaning you can listen to the language you are learning while at work, or school. For a full list of tools and gadgets I recommend for maximizing your immersion time, check out this blog post.
I just wanna say, thank you so much for this incredibly detailed guide. I could see that my study was stalling, because all of my learning was context free. This has given me a great way to get over the plateau. And it is super easy to read. And you predicted like, 3 different mistakes I was going to make. Thanks a bunch man!
I’m glad it was helpful! 😀
Dude this is a shit I always wanted to have. Didn’t expect much of this blog, but you amazed me not only by this blog, but also the 10000 sentences a month experiment. Keep it up:)
Thanks man! I’m glad the posts have been helpful 🙂
I forgot to ask, the cards you suspend and then learn later are just for learning purposes or do you move those cards to your Japanese deck which has your 10,000+ sentences?
Hi Streetsweeper, good to see you around 🙂
After I have finished a series or a film I will add those sentences that have been suspended to a side deck I call “New Sentences” and then “un-suspend” them. In here I go through them again, adding definitions to the ones I want to keep in my main deck (which has the 10k) and delete the rest that are too easy or I don’t want to add. After I have done this I then simply move the cards in bulk to the main deck. 🙂
I will add this to the main part of the post, thanks for asking the question 🙂
Thanks, I had a feeling something was missing.
Awesome, glad it’s going well. I know exactly how you feel. I’ve been pretty slow on the German side due to exams, coursework and other stuff. However, still maintaining listening and the immersion environment which is the main part of the process after all 🙂
This is actually the best thing ever. Right when I was starting to feel the burn of making sentence cards, this technique comes along and makes it more interesting than ever! Thanks! Also, would you happen to know what happened to Mattvsjapan’s videos? They were pretty inspirational for me a few months ago, but now they’re all gone!
I’m glad it’s helped 🙂
That’s a shame that they are gone. Some of them I found very helpful :S I didn’t know he removed them and I have no idea why he would either. :/
Unfortunetaly It’s not for Japanese (yet), but if you want to try learning 10,000 sentences in other languages there is an Android application for that: https://play.google.com/store/apps/details?id=info.puzz.a10000sentences
Note: I’m the author, the application is free and open source.
I was debating on whether to keep the Kanji subtitles on the front of the card or not.
My current format for my card just has the scene and the audio on the Front, with a the kanji+furigana, glossary, and a hint:Meaning on the back.
I think it depends on whether you’re trying to improve more your listening or reading. I get my reading practice from visual novels, so I was using Sub2SRS to supplement my listening. I want to start building up my 10,000 sentences, though… not sure if I should change up the formatting.
The part you mentioned about being able to crop out the bottom of subs in a hardsubbed show is awesome. I never realized that feature existed.
If you do enough passive and active listening you should be fine 🙂 Of course, you could have cards with different formats in which case just make a new note type and experiment 🙂
I’m glad it helped 😀
Good idea. I could do listening with some easier shows, and do reading with harder ones, and use some subdecks and make another format. I didn’t even think of how effective it would be to use utilize kanji-only on the front with audio and kanji+furigana on the back as reading practice. It’s like the best of both worlds, now, so I can up my listening and work towards my 10k sentences. (not sure if these anime sentences are going to count towards the real 10,000, but with suspending useless ones, it’ll be great.) I’m pretty hype right now.
Nice Blog entry, learned a lot.
How did you manage to add Furigana to the meaning part of your card?
When I enter {{furigana:Meaning}} into the card editor,
it don’t autocomplete the furigana. Even when I select it and click “add bulk reading”,
it doesn’t work. Did I do something wrong?
Also a bit offtopic,
you have http://www.britvsjapan.com/ and http://www.matthewhawkins.co/
how did you separate your blog (“blog.” before your domain) and your main page like this? I quite like the layout behind this 🙂
Thanks a lot, I appreciate your work.
Greetings from Germany
Julian
You have to actually add the [] and readings for each word in the meaning part. Unfortunately only the “Reading” field is auto generated. To generate the furigana reading when studying a card I open a new “Add” window in Anki, put the dictionary definition in the “Expression” field and then it generates furigana in the “Reading” field. I then copy and paste this into the original card. I hope that makes sense! 🙂
I’m using 1and1 hosting and they provide subdomains for free 🙂 If you have a website your hosting provider should allow you to do it through their online manager. 🙂
No worries! 😀
Ahh thanks,
Subdomain was the word i was looking for 🙂
Okay so the fastest way ist still to paste it into the expression field.
Hopefully they will add support for this function in the future.
Thanks for the quick edit 🙂
No problem 😀
I quickly added in some instructions in the add furigana section 🙂 If it still doesn’t make sense then let me know 🙂
役に立つ記事をありがとうごさいます?
もう長いこと日本人やってるのに、「た」から始まる漢字半分ちょっとしか読めませんでした笑
普段は主にYouTubeの動画を見ているんですが、字幕付きのものは少ないですよね。
英語字幕付きのテレビ番組やドラマが見られるサイトって他にありますかね〜
英語が母国語の方が普段楽しんでいるものを知りたいです
もしよかったら、教えてもらえませんか。
No worries Sho! 🙂
aha! Some of them are pretty hard right?
Yeah, that’s true. Only the really popular Youtubers tend to have subtitles on their videos. I’m not sure of any sites that have English subtitles but with a quick google search this site, subsmovies.com and ngorbit.tvmovie.co seem to be very popular (I haven’t used them myself though). As English is a more popular language and has more learners I am sure there are sites out there, you will just have to look hard. Google searching key words such as “watch english TV subtitles” should be enough to find stuff 🙂 My English friends all use online streaming sites but none of them have subtitles. If you would like to know what they use then I can ask them for you? 🙂
日本語で検索していたのであまり見つからなかったのですが、英語だとたくさん出てきました。
さっそくSentence Bank 作って、大量に英語を吸収します!
あと、マットさんのお友達が使ってるそのサイトも気になります。
教えてもらえたら嬉しいです。
ありがとう?
Awesome! I’m glad you found some 😀
Great! Let me know if you have any problems. I am willing to help 🙂
They said they use KissCartoon and CouchTuner. I’m not sure if you can access these in Japan but if you use a VPN then you should be fine 🙂
色々と教えてくれて本当に助かります。ありがとう!
どちらのサイトも日本からアクセスできましたよ。
当分家から出られなさそうです笑
Also https://kodi.tv/ might be worth looking into! It is hard to setup and a bit confusing, but it has a lot of English content available on it 🙂
I use this same method though slightly different. I don’t create decks or anything with Subs2srs and import because I originally started using Surusu(Khat’z site) for my SRS reviewing. Since my deck has nearly 6000 cards at the moment, I didn’t want to create a separate deck on a different program. Heck, I knew about this method since I had like 3000 cards in my deck from another learner of Japanese ironically named Matt.
What I do now is just save and open a bunch of subs with Notepad++ and then when I encounter a word and I want a context for it, I search it in Notepad++ and it looks through all my subs so I use that as my sentence bank. As far as learning individual episodes/shows, I just watch it once and see what I understood, then I watch it again and read the subs side by side(I typically just stream the video) and pick and choose what to add to my card. If it’s something I might want to hear, I’ll just use Audacity to record the audio and then I add it to google drive and add the link to the back of the card with the other info. In the end it’s similar to what’s being done in Anki.
Oh and have you ever found JP subs for GTO 2014? I can’t find the subs for this show but I have them for GTO 2012. There’s lines I just want to know what the heck was said but I feel like I”ll just have to understand it natively sometime in the future lol.
I see! Ah, not Matt from MattvsJapan by any chance? If so I didn’t realise that he used this method aha. Yeah that sounds just as good as what I am doing here.
I have a slightly different way of storing stuff as well which is very similar to that actually. Using notepad++ you can have loads of documents open at a time then search all of them for keywords or phrases. Before I worked out subs2srs I used that method, which is very similar to what you are doing.
Yeah that is exactly what I did before I discovered this aha, it works just as well in my opinion. I too don’t add words or grammar I already know but as subs2srs includes many sentence that does I do have to physically go through every sentence in a show, which can be time consuming.
I’m afraid I haven’t watched it aha I feel your pain with finding subs though lol
Yeah MattvsJapan. He had a video detailing this same method and I also seen this method on Jalup.
As for the subs, I feel like ultimately being able to understand the entire show just naturally will be the golden moment.