
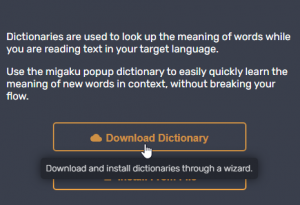
Migaku is probably the best language learning tool/addon for Anki.
Not only does it seamlessly synchronize with your Anki software to keep track of words you know, but it also allows you to easily sentence mine from a wide variety of sources on the web, including videos from YouTube and Netflix, while automating a lot of the flashcard creation process, streamlining your sentence mining experience to make it easier and less time-consuming.
Now Migaku is a paid addon, but considering its price and how useful it is for people studying languages with Anki, it really is worth the $5 a month.
If I had access to Migaku back in 2015 when I started learning Japanese, I would definitely have used it over my Sentence Bank method (which is free but rather tedious and time-consuming).
You can get an extra month free using my affiliate link: https://migaku.com/signup?code=britvsjapan if you’re thinking of using Migaku to study your language of choice.
This guide isn’t necessarily sponsored by Migaku, but I am in their affiliate program and I do get a small kickback if you use the above link. I would still be recommending Migaku even if I wasn’t as I believe it’s the most useful tool for language learners that use Anki out there.
Setting Up Migaku – Browser Plugin
The first thing we need to do is to download the Migaku browser plugin for google chrome.
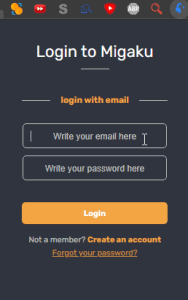
Once you have it downloaded, be sure to pin it to your extensions bar and sign in with your Migaku account.
If you don’t have an account then you can sign up here.
After you’ve logged into the plugin, you’ll need to select the language you’re learning and what dictionaries and frequency lists you wish to use.
To select your language simply click the settings cog in the top right of the main menu (after clicking on the addon button in your extensions toolbar).
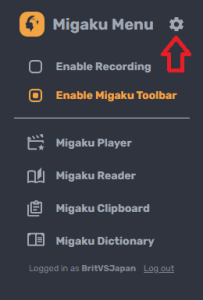
Then you will be brought to the “General Settings” page and from here you can select your language from the bottom left-hand part of the screen, in the sidebar menu.
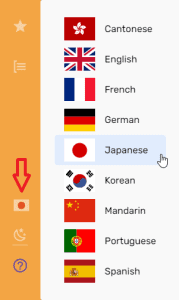
Once your language is selected, we can move on to importing dictionaries and frequency lists.
At this stage, you can just click the “Run default setup for Japanese” button which will go through this process for you, and install Migaku’s default settings for your language.
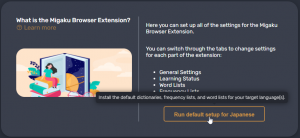
If you want to choose your own settings then follow the instructions below.
We need dictionaries so that we can add supplementary information to your Anki cards, automatically.
Normally this would be done by manually searching each word you wish to learn in an online dictionary and then copying and pasting its definition into your flashcard, but Migaku can do this for you.
To access the dictionary page, simply click the dictionary button on the left sidebar.
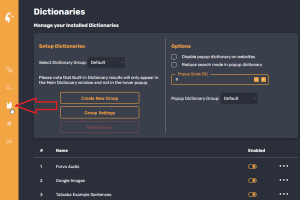
From here we can enable and disable the pre-installed dictionaries/frequency lists that are available to use or we can upload our own.
Installing Japanese to Japanese (J-J) Dictionaries in Migaku
If you’re a beginner and are only using Japanese to English dictionaries then you can skip this next part and come back to it when you want to start using Japanese-only dictionaries (unless you want to install other J-E dictionaries in which case the process is the same).
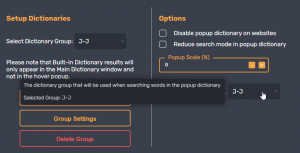
The first thing I recommend doing is creating a new dictionary group and giving it a relevant name.
We then need to change the Popup Dictionary Group to the new group.
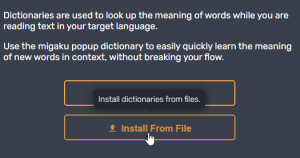
Adding your own dictionaries is really simple, all you need to do is click the “Install from file” button and navigate to where your dictionary is located. Make sure it is in .zip format.
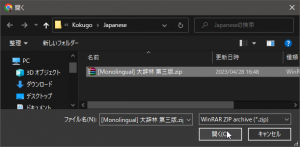
If you don’t have any monolingual dictionaries, or your ones won’t work, then you can get some from learnjapanese.moe.
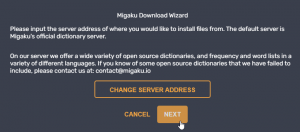
Currently, Migaku only has 2 available J-J dictionaries but if you want to install these as well then you can do so by clicking “Download Dictionary” and then clicking “Next” on the following window.
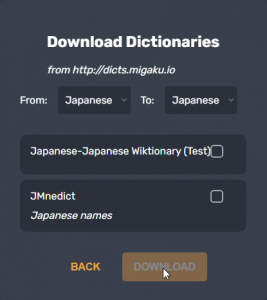
On the “Download Dictionaries” window you will see an option to choose “From: Language A To: Language B”.
Make sure both languages are set to Japanese and you should get the following dictionaries:
Click “Download”. They will take a while to install so don’t close the tab or Chrome, otherwise you will have to download them again.
Once downloaded you should find these new dictionaries in your dictionary list:
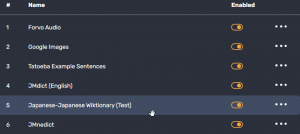
If you want these J-J dictionaries to display definitions first on the popup dictionary or in the card creator (which we will get into later) then click and drag them to the top of your dictionary list.
Next, let’s take a look at word and frequency lists.
You can install these by simply clicking the icons below the dictionary option on the left-hand menu bar as seen below.
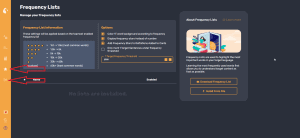
These lists can help highlight specific words that you might find important or that are frequently used in the language when reading a website or looking at subtitles, allowing you to tell through color coding which words are going to be seen more often, or perhaps which words you need to study for on an upcoming test.
You can also add your own lists by clicking the “Install from file” button in the same way that we did with dictionaries. If you don’t have any, or you need to check what format that these should be in, then check out this GitHub repo for a list of frequency lists that might be helpful.
Have a play around with the options to decide how best you want to use these features to color code your lists, however, you don’t actually need to use either of these options for sentence mining.
Setting up Migaku with Anki
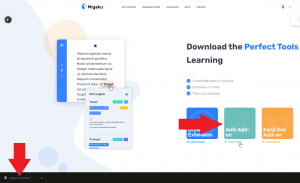
In order for the browser to communicate and add flashcards to Anki, you’re going to need to install the Anki Migaku add-on.
You can do this by once again going to Migaku’s download section on their website.
Once there, download the Anki Add-on and then click on the Migaku.ankiaddon file once it’s downloaded to your machine.
The add-on will then install and you should restart Anki.
If the browser plugin is running and you are signed in to Migaku then you can start using it.
If you don’t have an account then you can sign up for one using my affiliate code to get a free month.
The Migaku add-on will automatically add a new note type for you which comes with everything you need to start using Migaku and sentence mine with it.
Letting Migaku Know Which Words You Know and Are Learning
If you’ve already been using Anki then the first thing we are going to do is tell Migaku what words you already know.
This works by looking at your flashcard data to tell Migaku which words you have in long-term and short-term memory.
Migaku will then only highlight words that are not in Anki and that are considered “known words”, further streamlining your sentence-mining experience when browsing a website or watching a video in your target language.
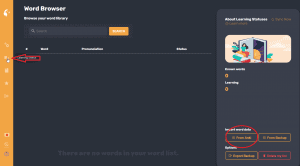
To do this simply go to the Migaku browser plugin and click the “Learning Status” button on the left-hand sidebar and then click the “From Anki” button on the right-hand side of the page.
If the Anki add-on is installed then this should show you a window of all your note types and the option to choose which fields to read your “known words” from.
You can also change the “Known Interval” option if you wish but it’s best to leave this as is.
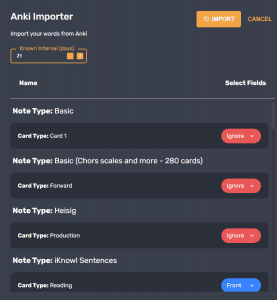
Simply go down the list choosing whether to ignore the note type altogether (useful if it’s a note type unrelated to your language) or which field to choose words from, usually the front.
You shouldn’t really need to do too much here though as Migaku will work out which note types should be ignored or not based on whether you have any cards made with those types.
Once done, click import, and Migaku will begin importing your known words from Anki.
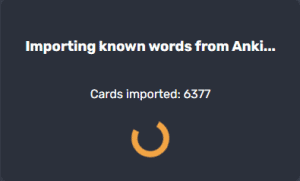
Once imported, you’re known words page should look something like this.

Here you can find and search for words to know their learned status, which is super useful for knowing which words you need to study more.
You also get a total of known words and words you are currently learning, which is awesome for motivation.
Now all we need to do is to start increasing those two numbers by sentence mining with Migaku and Anki.
Sentence Mining and Creating Flashcards with Migaku
Sentence Mining Webpages with Migaku
For YouTube and Netflix sentence mining skip to the next part of this section below.
In order to start sentence mining we are going to need some native content.
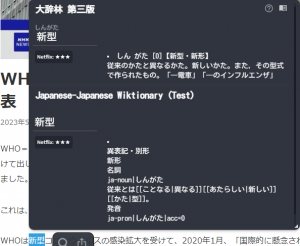
For this example, I will be using the NHK News website, but feel free to use any content that you enjoy or that you are interested in that is written by native speakers of your target language.
Once we are on the website we want to enable Migaku’s browser plugin so it can start parsing the text and begin highlighting words you don’t know, that are in any of your word lists, display pitch accent and dictionary definitions, and allow you to add highlighted sentences to Anki.
Once you’ve found a webpage you want to sentence mine, simply click on the Migaku logo that should be somewhere on that webpage, usually in the top left portion e.g.

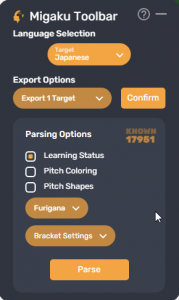
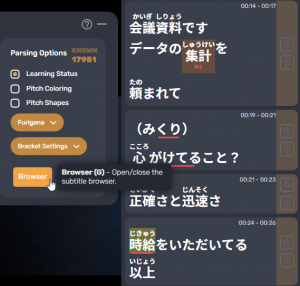
Clicking the logo will show you the Migaku Toolbar, this will allow you to set up your settings for changing the highlighting of the text in order for you to see which words you know and don’t, adding pitch accent information, and even generating furigana for kanji words (other languages may have similar features).
So for example, I have set my options to parse for “Learning Status” and “Furigana”.
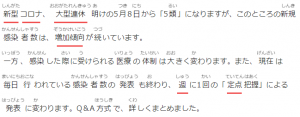
After hitting “Confirm”, the extension then changes the page to show words that aren’t in my Anki deck underscored with a red line, and it has created furigana readings for any kanji in the article.
If you want to reset these settings, simply refresh the webpage.
This is pretty amazing and a really useful tool for making any native content easily accessible to any learner.
So let’s say you’re reading through the article and you come across a word or sentence that you want to add to Anki.
In order to do this, simply highlight the text you want to add (while Anki is open) and press “Ctrl” to bring up a menu of two items, and then click the “Upload” icon to send it to the card creator.

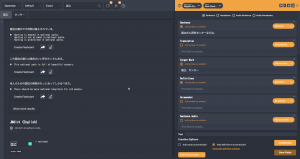
Doing this will open up the Migaku Dictionary on your computer, which gives you options for what note type you wish to use and what information you want to add to the card.
When you add a sentence or word in this way, you will notice that some information is automatically inserted into your fields and that any relevant dictionaries will be automatically searched and displayed on the left.
If you are adding cards manually then you can choose which definitions to add using the left-hand side of the card creator.
So in this case, we have parsed the text to highlight unknown words so the card creator will automatically create a new tab on the left for each unknown word.
You can of course change this to add every word by unselecting “Learning Status” in the parse options back on the webpage you are on.
Note that you can use this as a template that will be used from here on out for all your future cards (you may have to change it again if the settings reset), so when you import a new card after this then that new card will follow the layout of this template, importing any extra information from dictionaries, word lists, etc automatically.
While you can leave everything as is, you may prefer to make some changes.
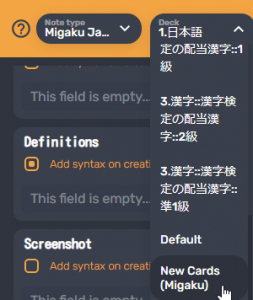
You will likely want to change the deck that the cards are imported to, and possibly the note type if you’re using your own custom note type.
To do this, simply click on the two options at the top of the template for “Deck” and/or “Note Type”.
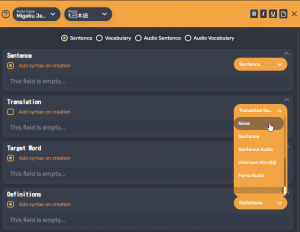
We next want to make sure that the template layout is set to “Sentence”, as we are sentence mining.
You can do this by clicking on the first button that says “Sentence” that’s underneath the yellow header section.

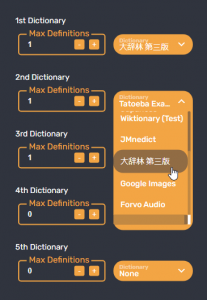
To change any of the fields and what they add to the cards, simply click on the downwards arrow on the right side of each field and a yellow drop-down menu will be added, letting you choose what you would like to be added to that field, or select none if you wish it to be left empty.
Migaku has a really useful YouTube video on the Card Creator here.
This is pretty useful if you run the default setup in the browser extension because you may have extra features that you don’t want showing on the card, for example, translations of the sentence.
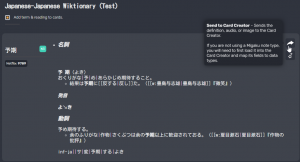
We will also need to make sure that Migaku automatically adds any dictionary definitions, that’s if you aren’t doing them manually.
If you do want to add them manually for each card, you simply need to scroll through your definitions on the left until you find one that you like, and then click the right-pointing arrow button to import that definition to your card.
To do this automatically we need to click the “Automatic definition settings” located at the bottom of the right-hand section.
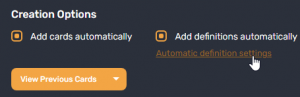
From here we can decide which dictionary definitions we want to automatically import into our cards. As you can probably imagine, this is incredibly useful for bulk-adding cards to Anki.
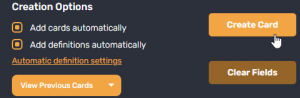
Once you’ve customized the card creator to your liking, click the ‘Create Card’ button in the bottom right and ensure that the ‘Add cards automatically’ checkbox is selected.
If you want to add extra information to each card manually then don’t select this option.
If the “Add cards automatically” check box was already checked, and you have edited your template, then you might find that the sentence we first selected is already added to your Anki and has your old template layout, so be sure to delete and re-add it.
You can then check the card by clicking “View Previous Cards” and selecting the newly added card. This will open the new card in the Anki card browser.
Now that the cards are in your Anki, simply go to the deck that you imported the cards to and start studying!
Sentence Mining YouTube and Netflix with Migaku
The process for sentence mining is the same for both YouTube and Netflix and is very similar to what we just did with a webpage.
Let’s run through the process of sentence mining a Netflix show.
The first thing we have to do is enable recording on the Migaku browser extension.
To do this simply click on the extension in your Chrome’s extension toolbar and click the “Enable Recording” checkbox.
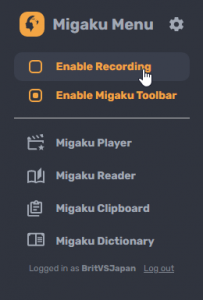
This will allow us to record video and audio from YouTube and Netflix shows, and put those snippets into our Anki flashcards.
Now let’s find a show that has Japanese audio and subtitles, we have to have subtitles for this to work.
The easiest way to find Japanese shows is to change your Netflix language for your profile to Japanese, and/or use a VPN and switch your location to Japan.
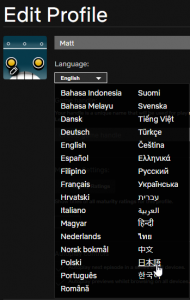
To change your language in Netflix simply log in and click on your profile and click “Manage Profiles”.
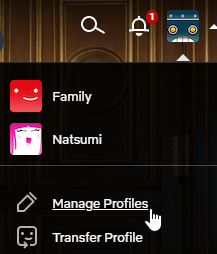
Then select the profile you wish to change the language of, and you will be shown an option to change the language.
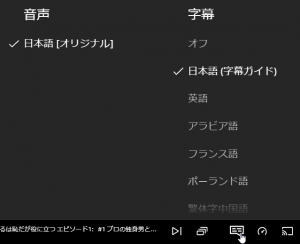
Once changed, go back to the homepage and find a show that has both Japanese audio and subtitles.
This can be a bit of trial and error as not all shows have both audio and subtitles, but most of them do.
To check if a show has Japanese audio and subtitles, click the subtitle button in the bottom right of the media player.
Once you’ve found a show, click on the Migaku extension icon which should be on your video player, in order to open up the Migaku toolbar.

Now that we have the Migaku Toolbar open we can choose a variety of options for showing the subtitles with extra information on them as we watch.
Each option has an explanation of what it does when you hover over them with your mouse, so take a look and adjust things to how you like them.
For this example, we are going to assume that we are going to watch the show at standard speed and only add sentences when we find a word or phrase that we don’t know.
The first thing we want to do is to choose the “Target” and “Native” languages.
You can ignore the “Native” language selection if you don’t want to add the “English” equivalent subtitle to your cards.
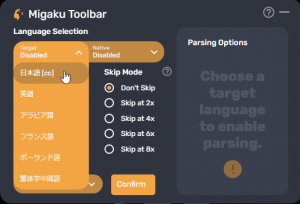
Once you choose your target language you will get some parsing options to choose from as well.
If you’re learning pitch accent, you can enable formatting here to help you with that.
You can also enable furigana generation for the subtitles that will appear next to the video by clicking on the drop-down menu that is defaulted to “Kanji”.
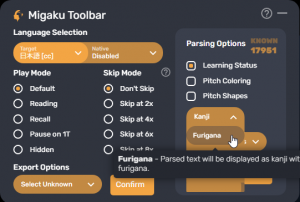
Once you’ve chosen your “Parsing Options”, click the “Parse” button and then the “Browser” button to bring up the subtitles next to the video, so that you can read/check them as you watch.
It’s also worth noting that there are some useful “Export Options” for those that want to download the subtitles separately, condense the audio that will be extracted, and only create cards that have unknown words in them.
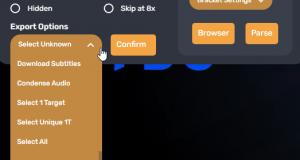
There’s even an option for “Select All”, this will allow us to create a deck for this show that has a card for every line of subtitles that are in the show. So if you prefer, you can do this and then delete cards you don’t need when studying them in Anki, as opposed to selecting the cards you want to add individually through the subtitle browser.
The standard way though is to find a sentence that you want to mine and select it in the subtitle browser on the right by just clicking on it.
You can then either add that card using the “Upload” icon on the right or mark it as selected so that you can select more cards later on and then create them in bulk.
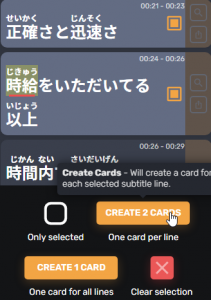
After clicking “Create cards” or the “Upload” icon to add a single card, Netflix will ask if you want to mute the audio, click “OK” and the cards will be generated.
You should now see a new window on your computer with the Migaku icon, this is the “Card Creator” which we went into in the previous example with sentence mining webpages.
For more information on changing the template of the “Card Creator”, have a look at the previous section on sentence mining webpages.
At the bottom of the “Card Creator”, you can click the button “View Previous Cards” to check the cards that have been added and make sure that they were imported correctly.

We can then check in the Anki browser to make sure that the audio and screenshot from the show are displayed and working correctly.
To do this from the Anki browser, click the “Preview” button.
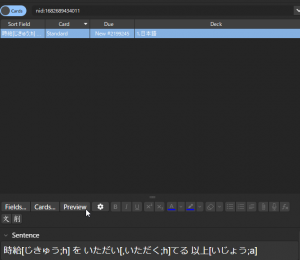
Then you can test the card by pressing the arrow buttons in the bottom right.
If done correctly, you should see the Japanese sentence on the front side of the card, then a screenshot on the back, followed by audio of the line said, the sentence again but color-coded, and then any extra information that you wanted displaying such as the English translation, dictionary definitions, and Google image results of any words in the sentence.

Now all you have to do is go into the Anki deck that your card(s) have been saved to and start studying!
Sentence Mining with the Migaku Reader and Clipboard
You can also use Migaku’s built-in reader for websites and other documents, and it’s really easy to use and sentence mine with.
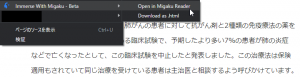
To use it just go onto any webpage or open file in your browser, right-click and go to “Immerse with Migaku” and then click “Open in Migaku Reader”.
Note: If you’ve already parsed a page with the Migaku Toolbar then be sure to refresh the page before doing this or it won’t import.
After importing you will get this pop-up where you can decide the importing options. In most cases you want to leave it as is, but if it imports and it displays the document incorrectly or if it’s hard to read, then try switching between “Readability”, “Full HTML” and “Text Only”.
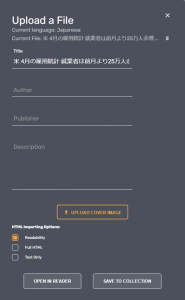
You can also save it to your collection, which might be useful in the future for finding example sentences.
Now you can mine sentences just like you would on any webpage, by clicking the Migaku icon to open the toolbar, and parsing the text.
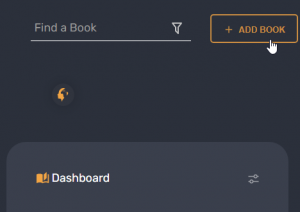
You can also add your own documents for the reader to sentence mine as well, simply click the “Add Book” button in the top right of the Migaku reader page.
Sending new sentences to the card creator is also the same, just highlight some text and press “Ctrl” on your keyboard to bring up the option to import it.
I actually prefer using this method over parsing a webpage directly, as the reader is only the text and a few images related to what you are reading.
This means the experience is going to be more smooth, with fewer web elements loading so less lag from your browser.
I also really like the reader for importing your own books. Although there are a variety of other ways to sentence mine while reading, this is by far one of the easier ways of doing it, and would highly recommend it.
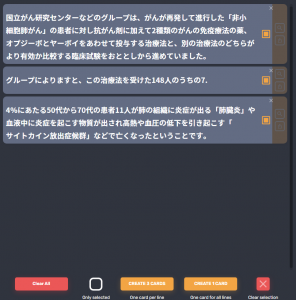
Now let’s try the Clipboard feature, which is simply a quick and easy way of parsing and sentence-mining copied text.
All you have to do is find some text you want to analyze or add to your sentence deck and copy it, then click on the Migaku extension icon on your extensions toolbar and click on “Migaku Clipboard”.
If you have text already copied to your computer’s clipboard then it should automatically be input to Migaku’s clipboard.
This can be quite a useful feature if you’re reading some other form of content that perhaps the reader doesn’t support or that you can’t view on the web and therefore the browser.
It’s also helpful for smaller pieces of text that you want to add to Anki as flashcards, but the text is still too big for one flashcard.
As it quickly breaks each sentence up into its own flashcard and automatically adds these to Anki with all of your previous settings for dictionaries, I’d say it’s another useful tool for any language learner.
Using Migaku’s Pop-up Dictionary
While not necessarily needed for sentence mining itself, Migaku does come with a pop-up dictionary for any of the text that it parses, whether it be on a webpage, subtitles on a video, or within the reader.
To use the dictionary simply highlight any piece of text or word and hit “SHIFT” on your keyboard.
This will bring up the dictionary that you’ve selected to be used within Migaku’s dictionary settings in the browser plugin.
When in the dictionary you can use the keys “A” and “D” to jump between definitions and “W” and “S” to jump between dictionaries, allowing you to check multiple definitions to ensure you understand a word.
Yet another super useful feature that makes reading your target language just that much simpler.
In my opinion, Migaku can make the sentence mining process smoother, easier, and automated, making it an invaluable tool for anyone learning a language using an input or immersion-based method.
I would highly recommend the tool to all language learners of all levels as it can save you a tonne of time. If you’re interested in checking it out then you can sign up here: https://migaku.com/signup?code=britvsjapan
Thank you very much for reading, I hope you found this useful!
Click here for more information on language learning
マット
By Matthew Hawkins05/05/2023Massive thanks to Harry and everyone else supporting me on Patreon. You guys are awesome! 🙂Follow me on TwitterSupport me on PatreonHere are some of my favorite tools and sites for learning Japanese
Thank you for reading this blog post, which I hope you found useful for learning Japanese. Here are some of the most useful websites that I’ve found for finding Japanese content to use for immersion as well as some really useful learning tools to help you through your Japanese studies. Some of these are affiliate links which just means that if you decide to use these sites by clicking the following links, then I will earn a commission. But honestly speaking, these are the sites that I use and recommend language learners, even my friends, to use anyway.
Anki Tools: To get started, I really like Migaku for Anki. By itself, Anki is already a super useful tool for language learners but Migaku allows for integration with websites like YouTube and Netflix, allowing it’s users to create flashcards from the shows and videos that they are watching, as they are watching them. If you use my link you can get an extra month for free.
Speaking Practice: For this I absolutely love iTalki. There are thousands of Japanese teachers on the platform that are available at all times of the day to have conversations with you, in Japanese. Some teachers take a more traditional approach while others are just there to chat, these are the ones I would recommend if you are looking to improve your conversational Japanese. Lessons start from just $5 and there’s no long term commitment, I highly recommend them.
Immersion: I’ve used a lot of different earphones / headphones over the years but by far the one that has come out on top is the NENRENT S570. This is a singular in-ear earphone that matches your skin tone to keep it discrete, meaning you can listen to the language you are learning while at work, or school. For a full list of tools and gadgets I recommend for maximizing your immersion time, check out this blog post.